Vue.js的生命周期详解
Vue 实例有一个完整的生命周期,也就是从开始创建、初始化数据、编译模板、挂载Dom→渲染、更新→渲染、卸载等一系列 过程,我们称这是 Vue 的生命周期。通俗说就是 Vue 实例从创建到销毁的过程,就是生命周期。
在Vue的整个生命周期中,它提供了一些生命周期钩子,给了我们执行自定义逻辑的机会。
它可以总共分为8个阶段:1
2
3
4
5
6
7
8beforeCreate(创建前),
created(创建后),
beforeMount(载入前),
mounted(载入后),
beforeUpdate(更新前),
updated(更新后),
beforeDestroy(销毁前),
destroyed(销毁后)
接下来我们用例子来看看生命周期钩子是怎么用的,HTML结构:1
2
3
4
5<div id="app">
<p>{{ message }}</p>
<input type="text" v-model="message">
<button v-on:click="change">改变数据</button>
</div>
我们对 input 和 p 绑定了data 对象的 message 数据,Vue 实例构建如下:1
2
3
4
5
6
7
8
9
10
11
12
13
14
15
16
17
18
19
20
21
22
23
24
25
26
27
28
29
30
31
32
33
34
35
36
37
38
39
40
41
42
43
44
45
46
47var app = new Vue({
el: "#app",
data: {
message: "hello world"
},
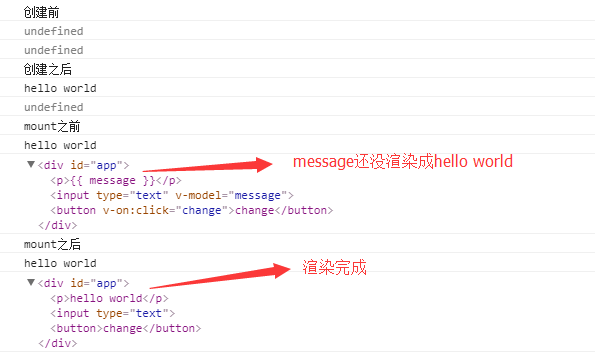
beforeCreate: function() {
console.log("创建前")
console.log(this.message)
console.log(this.$el)
},
created: function() {
console.log("创建之后");
console.log(this.message)
console.log(this.$el)
},
beforeMount: function() {
console.log("mount之前")
console.log(this.message)
console.log(this.$el)
},
mounted: function() {
console.log("mount之后")
console.log(this.message)
console.log(this.$el)
},
beforeUpdate: function() {
console.log("更新前");
console.log(this.message)
console.log(this.$el)
},
updated: function() {
console.log("更新完成");
console.log(this.message);
console.log(this.$el)
},
beforeDestroy: function() {
console.log("销毁前");
console.log(this.message)
console.log(this.$el)
console.log(this.$el)
},
destroyed: function() {
console.log("已销毁");
console.log(this.message)
console.log(this.$el)
}
})
然后在 methods 里面添加一个change方法:1
2
3
4
5methods: {
change :function() {
this.message = "vue.js"
}
}
点击按钮之后出现的是: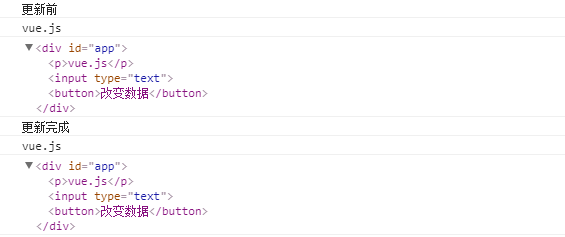
这就是vue的生命周期,很简单吧。
在实例中分别在每个生命周期钩子中console.log('钩子名称',this.message)我们发现,第一次页面加载时触发了 beforeCreate, created, beforeMount, mounted这几个钩子,data 数据在 created 中可获取到。再去console.log('mounted: ', document.getElementsByTagName('p')[0]) ,DOM 渲染在 mounted 中已经完成。
我们再试着去点击按钮更改 message 和 input 输入框中的内容,可以看到数据同步发生改变,这就是数据绑定的效果,在更新数据时触发 beforeUpdate 和 updated 钩子,且在 beforeUpdate 触发时,数据已更新完毕。
而 destroy 仅在调用app.$destroy()时触发,对 vue 实例进行销毁。销毁完成后,我们再重新改变 number 的值,vue 不再对此动作进行响应了。但是原先生成的dom元素还存在,可以这么理解,执行了destroy操作,后续就不再受vue控制了。
生命周期小结
生命周期钩子的一些使用方法:1
2
3
4
5
6beforecreate : 可以在这加个loading事件,在加载实例时触发
created : 初始化完成时的事件写在这里,如在这结束loading事件,异步请求也适宜在这里调用
mounted : 挂载元素,获取到DOM节点
updated : 如果对数据统一处理,在这里写上相应函数
beforeDestroy : 可以做一个确认停止事件的确认框
nextTick : 更新数据后立即操作dom